lunes, 30 de abril de 2012

Image Switcher View | Android Developer Tutorial


Now we will explore ImageSwitcher View. It is a view useful to switch smoothly between two images and thus provides ways of transitioning from one to another through appropriate animations.

We will implement the same concept of showing a gallery of images that scrolls at the top of the android screen landscape and upon selection of one image, it gets displayed as a larger image in the lower part through the use of an ImageSwitcher. This is what I had done earlier in the GalleryView tutorial but now instead of showing the selected picture through an ImageView, I will show it using a ImageSwitcher. Though the output may seem very similar, lot of other methods are available on the ImageSwitcher that can be used, if required.

Here is how the output would look (NOTE that I have not used the default gallery background provided by Android in the Gallery images)


So, to begin with, first we need to declare the layout xml to have a gallery and the ImageSwitcher:

<Gallery
      android:id="@+id/Gallery01"
      android:layout_width="fill_parent"
      android:layout_height="wrap_content"></Gallery>
<ImageSwitcher
      android:id="@+id/ImageSwitcher01"
      android:layout_width="fill_parent"
      android:layout_height="fill_parent">
</ImageSwitcher>

The next thing that we need to do is create a class that not only extends Activity but also implementsViewFactory. The ViewFactory is a Interface that creates views that need to be shown in theImageSwitcher. So it has one method makeView() which we need to implement. It is here that we can set the attributes of the ImageView that would be shown within the ImageSwitcher -  like its background, it scale, its layout parameters etc. – typically those attributes that we would have otherwise statically set through a layout xml.

Here is the class declaration and the method makeView():

public class ImageSwitcherView extends Activity implements ViewFactory {

and
      @Override
      public View makeView() {
            ImageView iView = new ImageView(this);
            iView.setScaleType(ImageView.ScaleType.FIT_CENTER);
            iView.setLayoutParams(new
                        ImageSwitcher.LayoutParams(
                                   LayoutParams.FILL_PARENT,LayoutParams.FILL_PARENT));
            iView.setBackgroundColor(0xFF000000);
            return iView;
      }
This alone is the real difference from the Gallery example.

Other smaller things we need to do is get a handle to the ImageSwitcher in the onCreate() method:

            iSwitcher = (ImageSwitcher) findViewById(R.id.ImageSwitcher01);
            iSwitcher.setFactory(this);
            iSwitcher.setInAnimation(AnimationUtils.loadAnimation(this,
                        android.R.anim.fade_in));
            iSwitcher.setOutAnimation(AnimationUtils.loadAnimation(this,
                        android.R.anim.fade_out));

Here we also set the animation on how the image should fly in and fly out of the area. Then, we get a handle to the gallery and set an ImageAdapter to it. The ImageAdpater is as described in my Gallery Example. If you have not seen that, please go through that and then try this example, as I would not want to repeat myself here.
Now on the click of a gallery image, we would want to pass the selected image to the ImageSwitcher and this is what we do here:

            gallery.setOnItemClickListener(new OnItemClickListener() {

                  @Override
                  public void onItemClick(AdapterView<?> arg0, View arg1, int arg2,long arg3) {
                        iSwitcher.setImageResource(pics[arg2]);
                  }
            });
      }

domingo, 29 de abril de 2012

Threads and Handlers | Android Developer Tutorial

Any mobile software development needs to be done with an awareness of the end user experience. This is true in any other domain as well. But special mention here on mobile development as end users are used to responsive apps on the mobile and any small delay is perceived as un-responsiveness or worse – that the application has hung.

One of the basic principles to provide a very responsive application is to handle any time consuming code in a separate thread – not the main thread or the UI thread as it is also known. So, it is very essential to understand about how to spawn new threads (worker or background threads) and how to come back to the parent thread.

How do the 2 threads (parent/UI and the worker threads) communicate? Here comes the Handler. By definition – “A Handler allows you to send and process Message and Runnable objects associated with a thread's MessageQueue. Each Handler instance is associated with a single thread and that thread's message queue.”

So, let us take the handler from the main thread and see how we can use it to communicate with a child thread.

When a handler is created, it is associated by default with the current thread. So, we have this piece of code in the main activity class:


Now, I spawn a new thread through a method that is called when I click a button. So, let us see the button piece of code first:
private Handler messageHandler = new Handler() {
};
public void handleMessage(Message msg) {
super.handleMessage(msg);
progressDialog.dismiss();
}

start = (Button) findViewById(R.id.Button01);

start.setOnClickListener(new OnClickListener() {});
@Override
public void onClick(View arg0) {
fetchData();
}
Now, on click of the button, the fetchData() method is invoked. Assuming that this is a very time consuming task, I will spawn a thread and do the task and return from that thread as shown in the code below:

protected void fetchData() {

progressDialog = ProgressDialog.show(this, "", "Doing...");


new Thread() {


public void run() {
try {
    Thread.sleep(800);} catch (InterruptedException e) {
}
messageHandler.sendEmptyMessage(0);
}
       }.start();
    }


Since it is time consuming, I am starting a ProgressDialog just to inform the end user that some activity is happening. Then, I start the thread, make it sleep for 800 milliseconds and send back an empty message through the message handler. The messageHandler.sendEmptyMessage(0) is the callback on the parent thread’s messageHandler to inform that the child thread has finished its work. In this example I am sending an empty message. But this can be the means of communication and exchange of data from the child thread to the parent Thread.

Now the control returns to handleMessage() call back method. That method shown in the beginning just dismisses the progressDialog.

In real life cases, within this thread we can do things like calling web-services, calling web-sites to fetch specific data or doing network IO operations and returning actual data that needs to be displayed on the front-end.

I will take up an example of an HTTP call invoked through such a thread in the next tutorial.

Also note that the Android UI toolkit is not thread-safe and must always be manipulated on the UI thread only. So the child thread should return all data and the painting of the UI should be left to the main thread or any UI specific thread.

There is a better way of handling this through the use of AsyncTask, a utility class available from SDK 1.5 onwards. It was available as UserTask earlier. 

viernes, 27 de abril de 2012

Custom ListView | Android Developer Tutorial

Now, we shall look at creating a custom list view – a custom layout, a custom row layout and how we bind the custom data holder to these layouts. (please see the earlier article on simple list view for the fundamentals of list view).

So, here again, we start with extending ListActivity.
public class MyCustomListView extends ListActivity {

Now let us create the custom list view in an xml file – custom_list_view.xml. This will be set using the setContentView() in onCreate() method:
<ListView android:id="@id/android:list"
android:layout_width="fill_parent"
android:layout_height="fill_parent"
android:background="#000fff"
android:layout_weight="2"
android:drawSelectorOnTop="false">
</ListView>
<TextView android:id="@id/android:empty"
android:layout_width="fill_parent" 
android:layout_height="fill_parent" 
android:background="#FFff00"
android:text="No data"
/>
Note that it must contain a ListView object with android:id="@id/android:list"

I have also declared a TextView which should be whon when the list if empty by declaring withandroid:id="@id/android:empty"

Now we will declare how each row in this ListView should be displayed by creating a new xml file –custom_row_view.xml

I plan to have 3 items one below the other in each row. So, here is the declaration for the same:
<TextView android:id="@+id/text1" 
android:textSize="16sp" 
android:textStyle="bold" 
android:textColor="#FFFF00" 
android:layout_width="fill_parent" 
android:layout_height="fill_parent"/>
<TextView android:id="@+id/text2"
android:textSize="12sp" 
android:textStyle="bold" 
android:layout_width="wrap_content" 
android:layout_height="fill_parent"/>
<TextView android:id="@+id/text3" 
android:typeface="sans"
android:textSize="14sp"
android:textStyle="italic"
android:layout_width="wrap_content" 
android:layout_height="wrap_content"/>
So, now, how do I tie all of this together? The MyCustomListView class, the listview layout and the row layout. Just like in the earlier example, we need a ListAdpater object. Here I plan to use aSimpleAdpater provided by the SDK. 

An adapter expects the context, the layout and the handle to the data that needs to be displayed. So, let us create a list of data in an ArrayList of HashMaps. This way, the HashMap can store any amount of data. 

static final ArrayList<HashMap<String,String>> list = 

new ArrayList<HashMap<String,String>>();
This is just a declaration of the list object. We need to populate it with data. Our custom row layout expects each row to have 3 prices of data…

This list is populated in a method as shown below with the 3 keys as ‘pen’, ‘price’ and ‘color’:

private void populateList() {
HashMap<String,String> temp = new HashMap<String,String>();
temp.put("pen","MONT Blanc");
temp.put("price", "200.00$");
temp.put("color", "Silver, Grey, Black");
list.add(temp);
HashMap<String,String> temp1 = new HashMap<String,String>();
temp1.put("pen","Gucci");
temp1.put("price", "300.00$");
temp1.put("color", "Gold, Red");
list.add(temp1);
HashMap<String,String> temp2 = new HashMap<String,String>();
temp2.put("pen","Parker");
temp2.put("price", "400.00$");
temp2.put("color", "Gold, Blue");
list.add(temp2);
HashMap<String,String> temp3 = new HashMap<String,String>();
temp3.put("pen","Sailor");
temp3.put("price", "500.00$");
temp3.put("color", "Silver");
list.add(temp3);
HashMap<String,String> temp4 = new HashMap<String,String>();
temp4.put("pen","Porsche Design");
temp4.put("price", "600.00$");
temp4.put("color", "Silver, Grey, Red");
list.add(temp4);
}
So, now how do we tie up the data with the row layout and the listview layout. It is in this simple piece of code in the onCreate() method of MyCustomListView class:
setContentView(R.layout.custom_list_view);
SimpleAdapter adapter = new SimpleAdapter(
this,
list,
R.layout.custom_row_view,
new String[] {"pen","price","color"},
new int[] {R.id.text1,R.id.text2, R.id.text3}

);
populateList();


setListAdapter(adapter);
Here we have set the default view to custom_list_view.
Then, using the SimpleAdapter, we have set the context, the list containing the data for display, the custom_row_view, the keys by which the data has to be fetched from the list, the TextViews into which the corresponding data has to be displayed.

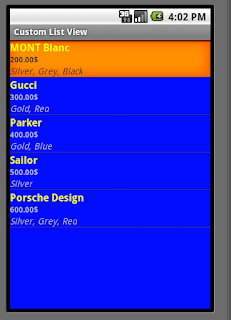
Now execute and you will have a custom list view. Here is what you will get to see:


NOTE: if you do not populate the list with any data, you will see another view – the empty listview that we have defined in thecustom_list_view.xml

You can download the complete source code for this examplehere.

Added later:
Based on a question below, I would like to add that an item can be clicked even in this custom list and the even captured by overriding the onListItemClick() method on the ListActivity class.

Here is the piece of code you can add to my sample, if you haev downlaoded and ti will toast a message on what has been selected:


protected void onListItemClick(ListView l, View v, int position, long id) {

    super.onListItemClick(l, v, position, id);
    Object o = this.getListAdapter().getItem(position);
    String pen = o.toString();
    Toast.makeText(this, "You have chosen the pen: " + " " + pen, Toast.LENGTH_LONG).show();
}

Enjoy....

miércoles, 25 de abril de 2012

Simple ListView | Android Developer Tutorial

From exploring the various concepts related to fundamentals and to locations and maps, I would like to look at a few UI elements.


One of the simple views is a List View. In this post, I will explore a very simple list view using all the defaults provided by Android SDK and introduce you to a customized list view in the next blog article.

A List View, by name means being able to display a list of items in an order one below the other. For creating such a view, the first thing we have to do is extend the ‘ListActivity’ (android.app.ListActivity) instead of the normal Activity class.

So, here is how the class declaration should look:

public class MyListView extends ListActivity {
The ListActivity class provides a way of binding a source of data (an array or a cursor) to a ListViewobject through a ListAdapter

In android, we all know that views are defined declaratively in XML files. It is the same here too. So, if we were to create our own custom ListView, we would have a declaration of this type:

<ListView android:id="@id/android:list"
android:layout_width="fill_parent"
android:layout_height="fill_parent"
android:background="#000fff"
android:layout_weight="2"
android:drawSelectorOnTop="false">
</ListView>

However, if no ListView is declared, the ListActivity picks up a default ListView which fills the screen. So, in our example we will not declare any list view.

There is one more thing we need to define and that is how each row in the list should show up. This again, there are some defaults available which have names such as simple_list_item_1, simple_list_item_2, and two_line_list_item. So, in our example, I do not declare the layout for the rows but I will be using one of the defaults provided. So, in effect, I have not declared any layout – I am using the default screen layout and row layout. 

Now, that we have the layouts out of our way, what else do we need for a List View. Of course, the list of data that needs to be displayed. Just to keep it simple, I will use an array of data for the same. So, here it is:

static final String[] PENS = new String[]{
"MONT Blanc",
"Gucci",
"Parker",
"Sailor",
"Porsche Design",
"Rotring",
"Sheaffer",
"Waterman"
};

Now, how do I bind this data to the default views described earlier? This is aided by a ListAdapterinterface hosted by the ListActivity class that we have extended.

We need to use the setListAdapter(..) method of the ListActivity class to bid the two (data and view). Android provides many implementations of the ListAdapter. We will use the simpleArrayAdapter.

What does the ArrayAdapter expect?

It expects the context object, the row layout and the data in an array.

So here it is:

setListAdapter(new ArrayAdapter<String>(this,
android.R.layout.simple_list_item_1, PENS));
With this we are done in creating the ListView.

I have added a small piece of code to show we can handle events on selecting an item in the list, by overriding the protected method shown below:

protected void onListItemClick(ListView l, View v, int position, long id) {
super.onListItemClick(l, v, position, id);
Object o = this.getListAdapter().getItem(position);
String pen = o.toString();
Toast.makeText(this, "You have chosen the pen: " + " " + pen, Toast.LENGTH_LONG).show();
}

This toasts a message with the item selected.