I received my Nexus One earlier this week after snatching up a bargain from eBay. It came in such good condition that I actually thought it was brand new. I’m completely blown away by how fast it is compared to my Hero. Here’s what I think after 3 days of use:
Speed – it is FAST. There’s no such thing as lag. I open as many applications as I possibly can and still it handles everything fine whilst closing older apps in the background as Android does. Everything runs very smoothly, including all animations, games, video streaming to Qik, watch video on iPlayer. The browser is superb too and takes a mere few seconds to load a full webpage even on 3G.
Camera – another massive improvement. The quality is excellent with pictures and video now being far superior to the Hero. I’ll take some photos later on and upload so you can see for yourself. The Flash works perfectly and taking pictures in low-light conditions is no longer a problem.
Applications – absolutely tonnes of applications to choose from. As you probably know, or if you didn’t know, then the Android market saw over 9000 applications added in March alone, but bear in mind a large per cent of these will probably be spam apps. Games are great to play now, no lag, smooth graphics and very responsive touch. Here’s a list of a few favourite apps and games I have installed right now:
Act 1 Video Player – video player
BeebPlayer – iPlayer app
FarmFrenzy – farm game
idemolished – puzzle game
LightUp – awesome puzzle game
Layar – uses the camera and GPS to provide all different kinds of information about your surroundings
Pkt Auctions – eBay app
Qik – stream video from your phone to web
User Interface – I was always concerned about getting a Nexus One thinking that after using the Hero, I would always need Sense on my Android phone. In fact, I only bought the Nexus after reading that Paul at Modaco had launched the Desire ROM for Nexus One’s. After receiving the phone and playing around with Vanilla Android I’ve realised that I don’t actually care much for Sense any more. The novelty of so many widgets has pretty much worn off after using the Hero for so many months. I only really need the Power widget and and links to a few favourite apps. I did install GDE which is a desktop replacement for the default launcher. It’s application dock widget is fantastic, and so’s it’s launcher. I’ll try to get some screenshots or videos of my Nexus up soon.
Problems – despite having so many positive things to say about it, it’s not all been a smooth experience. The display is very crisp, bright and even outdoors under the Sun the AMOLED isn’t a problem with auto-brightness turned on. No, the main problem lies in the responsiveness of the touch screen. When I’m holding the phone in one hand and controlling the touchscreen with the other it’s no problem. However, when I’m in bed trying to do anything, it completely misjudges the location I’ve touched and does something completely random for instance typing a message and hitting the letter ‘q’ might sometimes decide it wants to go to the Home screen! Sometimes it just acts like you’ve not even touched it. As you can tell, it gets very frustrating very quickly and I’m hoping so hard that this is a bug that can be fixed by a software update.
Verdict – Overall, superb phone, very responsive. I love the display, the speed, the camera and the actual feel of the phone. The problem with the touch-screen not responding correctly is the biggest drawback, but I still think it’s worth getting. Lack of Sense wasn’t a problem, in fact it gives more space for applications for people that don’t root their phone (I haven’t root mine(yet)).
This is an interesting interview published into Techcrunch.com , where Jason Kincaid ( currently works as a writer at TechCrunch ) tell us everything about his new SmartPhone with Android 4.0 Ice Cream Sandwich. So, here, the complete post, see you and enjoy it, Lic. Mariano Salvetti
My First Day With The Galaxy Nexus And Ice Cream Sandwich (This Is Really Big)
The Galaxy Nexus is big.
There, we’ve got that out of the way (don’t worry, we’ll revisit it shortly). Now onto the more important news: Ice Cream Sandwich, the new version of Android that ships on the Galaxy Nexus, represents a big step in the right direction: it’s making Android, which has long been faulted for being more confusing than iOS, significantly easier to use.
I received my loaner Galaxy Nexus from Google around twenty four hours ago (seven of which I spent in blissful slumber), so this post can’t be considered a review. Rather, think of it as my early impressions. I know what’s new, and I think I know which changes I like, but I’m still in the honeymoon-slash-’Why is this different?!’ phase. With that said, let’s get to it.
As I noted before, one of the big themes in ICS, which is both perfectly understandable and mildly frustrating at times, is a push to make Android easier to use for people who aren’t ‘power users’. Some buttons have vanished. Others have been made more readily visible. And for the most part, Google has achieved its goal.
The biggest changes involve navigation. Since Android first launched on the G1, nearly all devices have featured four dedicated buttons beneath the screen: Back, Home, Menu, and Search. They had a learning curve (it took a while, for example, to figure out that if an option you wanted wasn’t immediately visible, it was probably tucked away under the Menu button). But once you got the hang of them, they worked.
Unfortunately many people never did figure them out.
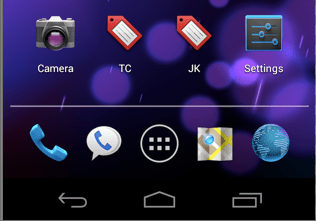
And so Google has done away with two of the buttons entirely: both the Search and Menu buttons have been removed, and have been replaced with an app switcher button. This change first appeared in Honeycomb, but because Honeycomb was for tablets only, it felt like more of a blank UX slate. Now that the change is on phones, it’s much more apparent.
My first reaction to the three-button layout: it drove me nuts. I’ve long since become accustomed to hitting Android’s dedicated Search button — especially because you could previously launch Android’s handy voice search and Voice Actions by holding down the button for a second or two, no matter which app you were using.
No more. Now the only way to launch voice search is to go to one of your home screens and tap on the microphone that’s shown in the (now unmovable) Google Search widget.
Google’s logic behind the change makes sense though. The old, four-button system could be confusing because it wasn’t consistent: two of the buttons, Home and Back, applied to systemwide navigation. Two of them, Search and Menu, were relevant to the application you were looking at.
Because of this, Google says that according to user studies, many people never really understood what the search button was for, much less what long-pressing it would do. This was especially bad because many applications won’t show a search bar until you hit the search button — which is logical, but becomes problematic when peope don’t know they’re supposed to hit the button in the first place. Similar rationale explains why the dedicated Menu button has been eliminated: people didn’t know when to hit it, and so they would oftentimes miss out on key features.
Of course, now that those two buttons are gone, Android has to find another way to surface those options. The solution is called the Action Bar, which, again, was first introduced in Honeycomb.
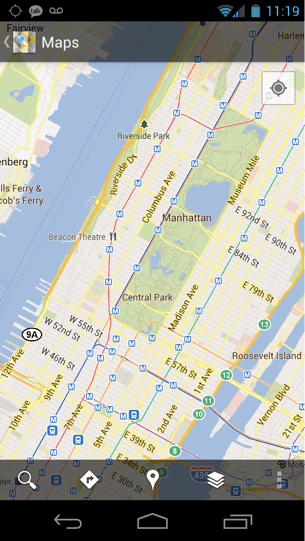
If you’ve used iOS before, the Action Bar will make you feel right at home. In short, it’s a mostly-consistent way for apps to surface features and to help you navigate between screens. Open the Maps app and you’ll see an Action Bar at the bottom of the screen with icons for Search, Directions, Places, and Map Layers. In other words, you don’t really have to go looking for anything anymore — the core features are just there.
Of course, some applications offer more features than can easily be shown on screen at once. Google’s solution to this is a new icon that consists of three small, vertically aligned squares. Tap it, and you’ll typically see advanced options and settings. This three-square icon does essentially the same thing as the dedicated Menu button did before, but it’s easier to find because it’s always shown onscreen somewhere.
It’s also more apparent that the new menu button belongs to the application you’re looking at, as opposed to some kind of system-wide Menu that people may have mistakenly associated with the old hardware button.
Aside from the ommited Search button, which I miss simply because it makes my beloved voice control harder to get to, this new setup feels like a huge step in the right direction. Most people are going to be excited about Ice Cream Sandwich’s more flashy features, but this is a fundamental and important change that is going to make Android easier to use for a lot of people — which is why I’ve spent so many words on it.
Oh, and if you’re a search-button-loving power-user like me, don’t get too riled up — you’ll doubtless be able to install a custom launcher app in the near future that’ll let you tweak these three main nav buttons to your heart’s content.
Okay, time for the fun stuff.
One of the highly-touted features in ICS is a new phone locking mechanism that uses face detection — simply point the phone’s front-facing camera at your face and it’ll unlock, without you having to bother with entering a PIN or onscreen pattern.
It’s definitely nifty, but you’re actually warned during setup that someone who looks like you might be able to unlock your phone, and there are videos on YouTube of people unlocking it with photos of people. So what’s the point?
Google acknowledges that there are other, more secure ways to lock your phone. But there are many, many people who don’t use any kind of PIN or pattern lock at all because they’re tedious to enter. These are the people that Face Unlock is catering to. Once it’s set up, it typically takes zero effort (the face detection works well in normal lighting, though it can’t handle dark rooms). And the reality is that if you lose your phone somewhere, there’s a good chance that the person who finds it will have no idea what you look like, anyway.
Is this something you’re going to want to use if you traffic in confidential information or scandalous texting? Not at all. But if you aren’t using a screen lock already, it’s definitely worth trying out.
App Upgrades and Overhauls
The Contacts application has been totally redone and is now called ‘People’. It’s pretty slick, listing all of your contacts from services that can include Google+ and Twitter in one place. Each contact has their most recent status update shown beneath their name, and tapping on one of them brings you to a nice profile page with big writing and bigger photos. I’m not really one for Contact apps in the first place (I much prefer to just tap the ‘search’ button to find the person I’m looking for), but it’s definitely a step up.
The Camera app has gotten some major improvements. It’s now possible to tap-to-zoom (cue thousands of Apple fans scoffing). There’s a panorama mode that lets you move your camera to stitch together one giant photo. And you can now tap the screen while you’re recording a video to take a high-res still shot.
Most important, though, is the fact that you can shoot photos in very quick succession. Google’s promise of zero shutter lag doesn’t disappoint, though you will want to give the phone a moment to focus between shots if you’re whirling it around at different things (also, there’s a brief pause if your photo uses a flash).
The browser has some new features, including an option to save pages for offline viewing. And Gmail has gotten a nice overhaul as well — but I’m still feeling both of these out. I’ll have more thoughts on them soon.
Voice
As you may have noticed earlier, I’m a big fan of Android’s deeply integrated voice features. Google hasn’t made nearly as many improvements here as I would have liked — I can’t understand why Voice Actions still offer the same feature set as when they launched over a year ago, especially when Apple’s Siri is one of the iPhone 4S’s biggest selling points. But ICS does introduce a major improvement in the way voice transcription works.
Before now entering voice input on Android has been a remarkably high pressure affair. You’d initiate it by tapping the microphone (or holding onto my ill-fated Search button), then have a few seconds to speak your mind — without any pauses. Wait too long between words, and Android would assume you’d finished.
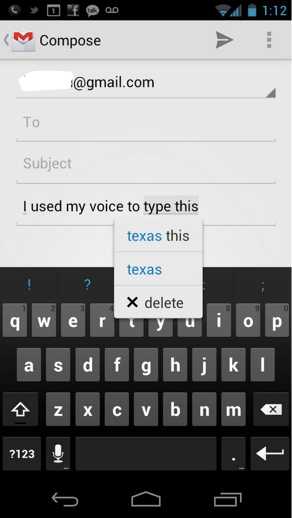
The new version fixes this, and then some. As you start speaking, you’ll see Android start transcribing the text in near real-time. You can pause as long as you’d like before you complete a sentence. It’s hard to appreciate until you’ve used it, but it makes these voice features that much more enjoyable to use.
Also, it’s now significantly easier to modify the text after Android has transcribed it — if you’re mistranscribed, you can tap on words with grey underlines to see similar-sounding phrases that might be correct. That said, the interface for this a little is hit-or-miss (sometimes I’ll mean to tap on an incorrect word, but it’ll select a phrase, or vice versa).
The Hardware
I’ve sort of buried this section intentionally. I haven’t had the phone long enough to do any kind of battery testing, and while my brain seems to adapting to the UI reasonably quickly, my hands are apparently a bit less elastic. In other words, the device feels really… different.
The phone is huge. It is thin and very light, and it doesn’t feel bulky, per se. But I find myself doing finger gymnastics as I use it: sliding my pinkie beneath the device when I need to tap the ‘Back’ button at the bottom of the phone, then sliding it back up the side when I need to tap on the search box, which is at the top of the screen. In other words, I can’t navigate the UI without moving my hand around.
Now, I am a man blessed with fairly small hands, and I’ve been using the much-smaller Nexus One as my primary device for years now. So this difference may be more jarring to me than other people. I’ve been told to give it a few days, and there’s a decent chance I’ll get used to it. But I’m still skeptical — I’ll have more thoughts along these lines in the coming weeks.
Thankfully, the device’s giant screen has an upside: it’s a beauty to look at. Text looks fantastic. And the relatively vast screen real estate means that applications can fit in more buttons and content without feeling cramped. Oh, and remember the three software nav buttons I discussed earlier? When you’re watching a movie, those vanish entirely, which means nearly the entire fron to fhte phone becomes a video display. It’s really nice.
And finally, there’s the matter of performance, which I’ll save a discussion on the device’s performance for a future post as well. Usually it hums along, but I’ve had one or two moments where where it reminded me of my Nexus One, pausing at odd moments and apparently ignoring finger taps. This hasn’t happened often — and Google says at least one of the issues I saw is a known bug that has already been fixed on devices customers will receive. So we’ll see how it performs over the coming weeks.
Here’s a video walkthrough of some of the features:
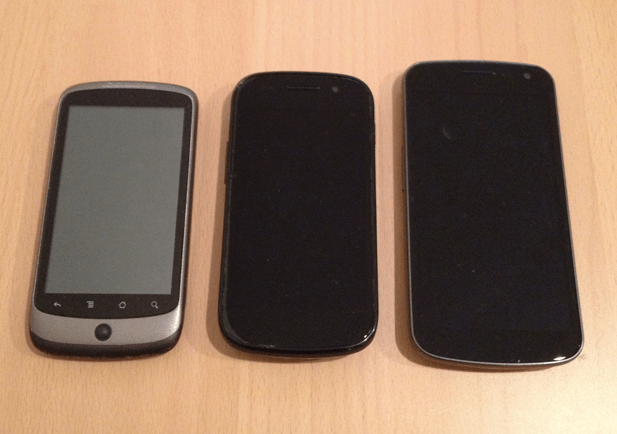
From left to right: Nexus One, Nexus S, Galaxy Nexus
This app is also available on the Android Marketplace. Search for "vogella" for find this example.
Select File → New → Other → Android → Android Project and create the Android project "de.vogella.android.temperature". Enter the following.
Press "Finish". This should create the following directory structure.
While "res" contains structured values which are known to the Android platform the directory "assets" can be used to store any kind of data. In Java you can access this data via the AssetsManager and the method getAssets().
6.2. Two faces of things
The Android SDK allows to define certain artifacts, e.g. strings and UI's, in two ways, via a rich editor and directly via XML. The following description tries to use the rich UI but for validation lists also the XML. You can switch between both things by clicking on the tab on the lower part of the screen. For example in the Package Explorer select "res/layout/main.xml".
6.3. Create attributes
Android allows you to create attributes for resources, e.g. for strings and / or colors. These attributes can be used in your UI definition via XML or in your Java source code.
Select the file "res/values/string.xml" and press "Add". Select "Color" and enter "myColor" as the name and "#3399CC" as the value.
Add also the following "String" attributes. String attributes allow to translate the application at a later point.
Table 1. String Attributes
Name
Value
celsius
to Celsius
fahrenheit
to Fahrenheit
calc
Calculate
Switch to the XML representation and validate the values.
Select "res/layout/main.xml" and open the Android editor via a double-click. This editor allows you to create the UI via drag and drop or via the XML source code. You can switch between both representations via the tabs at the bottom of the editor. For changing the position and grouping elements you can use the outline view.
The following shows a screenshot of the Palette view from which you can drag and drop new UI elements into your layout. Please note that the "Palette" view changes frequently so your view might be a bit different.
Right-click on the text object “Hello World, Hello!” in the layout. Select Delete on the popup menu to remove the text object. Then, from the “Palette” view, select Text Fields and locate “Plain Text”. Drag this onto the layout to create a text input field. All object types in the section "Text Fields” derive from the class "EditText", they just specify via an additional attribute which text type can be used.
Now select the Palette section “Form Widgets” and drag a “RadioGroup” object onto the layout. The number of radio buttons added to the radio button group depends on your version of Eclipse. Make sure there are two radio buttons by deleting or adding radio buttons to the group.
From the Palette section Form Widgets, drag a Button object onto the layout.
The result should look like the following.
Switch to "main.xml" and verify that your XML looks like the following.
If you select a UI element you can change its properties via the properties view. Most of the properties can be changed via the right mouse menu. You can also edit properties of fields directy in XML. Typically you change properties directly in the XML file as this is much faster. But the right mouse functionality is nice if you are searching for a certain property.
We will delete the intial text for the EditText field in XML. Switch to the "main.xml" tab and delete the "android:text="EditText" property from the EditText part. Switch back to the "Graphical Layout" tab and check that the text is removed.
Use the right mouse click on the first radio button to assign the "celsius" string attribute to its "text" property. Assign the and "fahrenheit" string attribute to the second radio button.
From now on I assume you are able to use the properties menu on the UI elements. You can either edit the XML file or modify the properties via right mouse click.
Set the property "Checked" to true for the first RadioButton. Assign "calc" to the text property of your button and assign "myClickHandler" to the "onClick" property. Set the "Input type" property to "numberSigned" and "numberDecimal" on your EditText.
All your other UI controls are contained in a LinearLayout. We want to assign a background color to this LinearLayout. Right-click on an empty space in Graphical Layout mode, then select Other Properties → All by Name → Background. Select “Color” and then “myColor” in the list.
Switch to the "main.xml" tab and verify that the XML is correctly maintained.
Change your code in "ConvertActivity.java" to the following. Note that the "myClickHandler" will be called based on the "On Click" property of your button.
package de.vogella.android.temperature;
import android.app.Activity;
import android.os.Bundle;
import android.view.View;
import android.widget.EditText;
import android.widget.RadioButton;
import android.widget.Toast;
publicclass ConvertActivity extends Activity {
private EditText text;
@Overridepublicvoid onCreate(Bundle savedInstanceState) {
super.onCreate(savedInstanceState);
setContentView(R.layout.main);
text = (EditText) findViewById(R.id.editText1);
}
// This method is called at button click because we assigned the name to the// "On Click property" of the buttonpublicvoid myClickHandler(View view) {
switch (view.getId()) {
case R.id.button1:
RadioButton celsiusButton = (RadioButton) findViewById(R.id.radio0);
RadioButton fahrenheitButton = (RadioButton) findViewById(R.id.radio1);
if (text.getText().length() == 0) {
Toast.makeText(this, "Please enter a valid number",
Toast.LENGTH_LONG).show();
return;
}
float inputValue = Float.parseFloat(text.getText().toString());
if (celsiusButton.isChecked()) {
text.setText(String
.valueOf(convertFahrenheitToCelsius(inputValue)));
celsiusButton.setChecked(false);
fahrenheitButton.setChecked(true);
} else {
text.setText(String
.valueOf(convertCelsiusToFahrenheit(inputValue)));
fahrenheitButton.setChecked(false);
celsiusButton.setChecked(true);
}
break;
}
}
// Converts to celsiusprivatefloat convertFahrenheitToCelsius(float fahrenheit) {
return ((fahrenheit - 32) * 5 / 9);
}
// Converts to fahrenheitprivatefloat convertCelsiusToFahrenheit(float celsius) {
return ((celsius * 9) / 5) + 32;
}
}
6.7. Start Project
To start the Android Application, select your project, right click on it, Run-As-> Android Application Be patient, the emulator starts up very slow. You should get the following result.
Type in a number, select your conversion and press the button. The result should be displayed and the other option should get selected.
7. Starting an deployed application
After you ran your application on the virtual device you can start it again on the device. If you press the Home button you can also select your application.
During i was trying to search about the IceCream Sandwich, i got the below image which i think useful to the novice Android programmer for knowing about the Android version names.
The following assume that you have already Eclipse installed. For details please see Eclipse Tutorial .
3.1. Eclipse and automatic Android SDK
Use the Eclipse update manager to install all available components for the Android Development Tools (ADT) from the URL https://dl-ssl.google.com/android/eclipse/ . If you are not familiar with the Eclipse update manager the usage is described in Eclipse update manager .
After the new Android development components are installed you will be prompted to install the Android SDK. You can do follow the following wizard or go to the next section to learn how to do it manually.
3.2. Manually install Android SDK
The previous step downloads the Android SDK automatically for you. You can also download the Android SDK manuallz from the Android homepage under Android SDK download . The download contains a zip file which you can extract to any place in your file system, e.g. I placed it under "c:\android-sdk-windows". Avoid using spaces in the path name otherwise you may experience problems later.
You also have to define the location of the Android SDK in the Eclipse Preferences. In Eclipse open the Preferences dialog via Windows → Preferences . Select Android and enter the installation path of the Android SDK.
3.3. Install a specific Android version
The Android SDK Manager allows you to install specific versions of Android. Select Window → Android SDK Manager from the Eclipse menu.
The dialog allows you to install new package and also allow you to delete them. Select "Available packages" and open the "Third Party Add-ons". Select the Google API 14 (Android 4.0) version of the SDK and press "Install".
Press the "Install" button and confirm the license for all package. After the installation restart Eclipse.
3.4. Android Source Code
The following step is optional.
During Android development it is very useful to have the Android source code available as Android uses a lot of defaults. Haris Peco maintains plugins which provides access to the Android Source code code. Use the Eclipse update manager to install the Android Source plugin from the following update site: "http://adt-addons.googlecode.com/svn/trunk/source/com.android.ide.eclipse.source.update".
More details can be found on the project website .
4. Emulator Shortcuts
4.1. Create an Android Emulator Device
The Android tools include an emulator. This emulator behaves like a real Android device in most cases and allows you to test your application without having a real device. You can emulate one or several devices with different configurations. Each configuration is defined via an "Android Virtual Device" (AVD).
To define an AVD open the "AVD Manager" via Windows → AVD Manager and press "New".
Enter the following.
We can also select the box "Enabled" for Snapshots. This will make the second start of the virtual device much faster.
At the end press the button "Create AVD".This will create the device and display it under the "Virtual devices". To test if your setup is correct, select your device and press "Start".
After (a long time) your device should be started.
4.2. Using the emulator
Obviously you can use the emulator via the keyboard on the right side of the emulator. But there are also some nice shortcuts which are useful. Alt+Enter maximizes the emulator. Nice for demos. Ctrl+F11 changes the orientation of the emulator. F8 turns network on / off.
4.3. Performance
Try to use a smaller resolution for your emulator as for example HVGA. The emulator gets slower the more pixels its needs to render as it is using software rendering.
Also if you have sufficient memory on your computer, add at least 1 GB of memory to your emulator. This is the value "Device ram size" during the creation of the AVD.
Also set the flag "Enabled" for Snapshots. This will save the state of the emulator and let it start much faster.
5. Error handling and typical problems
Things are not always working as they should. This section gives an overview over typical problems and how to solve them.
5.1. Clean Project
Several users report that get the following errors:
Project ... is missing required source folder: 'gen'
The project could not be built until build path errors are resolved.
Unable to open class file R.java.
To solve any of these errors, go to the project menu and select Project -> Clean.
5.2. LogCat
The LogCat view shows you the log message of your Android device and help you analyzing problems. For example Java exceptions in your program would be shown here. To open this view, select "Window -> Show View -> Other -> Android -> LogCat" from the menu.
5.3. Emulator does not start
If your emulator does not start, make sure that the androd-sdk version is in a path without any spaces in the path name.
5.4. Error message for @override
The @override annotation was introduced in Java 1.6. If you receive an error message for @override change the Java compiler level to Java 1.6 via right-mouse click on the project -> Properties -> Java Compiler -> Compiler compliance level and set it to "1.6".
5.5. Missing Imports
Java requires that the classes which are not part of the standard Java Language are either fully qualified or declared via imports. In your editor use the click mouse click, select "Source-> Organize Imports" if you see error message with "XX cannot be resolved to a variable".
5.6. Eclipse Tips
To work more efficient with Eclipse, select Window -> Preferences -> Java -> Editor -> Save Actions and select that the source code should be formated and that the imports should be organized at every save.
Android is an operating system based on Linux with a Java programming interface. It provides tools, e.g. a compiler, debugger and a device emulator as well as its own Java Virtual machine (Dalvik Virtual Machine - DVM).
Android is officially guided by the Open Handset Alliance but in reality Google leads the project.
Android supports 2-D and 3-D graphics using the OpenGL libraries and supports data storage in a SQLite database.
Every Android applications runs in its own process and under its own user id which is generated automatically by the Android system during deployment. Therefore the application is isolated from other running applications and a misbehaving application cannot easily harm other Android applications.
1.2. Important Android components
An Android application consists out of the following parts:
Activity - represents the presentation layer of an Android application, e.g. a screen which the user sees. An Android application can have several activities and it can be switched between them during runtime of the application.
Views - the User interface of an Activities is built with widget classes which inherent fromandroid.view.View. The layout of the views is managed by android.view.ViewGroups. Views often have attributes which can be used to change their appearance and behavior.
Services - perform background tasks without providing an UI. They can notify the user via the notification framework in Android.
ContentProvider - provides data to applications, via a content provider your application can share data with other applications. Android contains a SQLite DB which can serve as data provider
Intents - are asynchronous messages which allow the application to request functionality from other services or activities. An application can call directly a service or activity (explicit intent) or ask the Android system for registered services and applications for an intent (implicit intents). For example the application could ask via an intent for a contact application. Applications register themselves to an intent via an IntentFilter. Intents are a powerful concept as they allow the creation of loosely coupled applications.
BroadcastReceiver - receives system messages and implicit intents, can be used to react to changed conditions in the system. An application can register as a BroadcastReceiver for certain events and can be started if such an event occurs.
Widgets - interactive components primary used on the Android homescreen to display certain data and to allow the user to have quick access the the information
Other Android components are Live Folders and Android Live Wallpapers. Live Folders display data on the homescreen without launching the corresponding application.
1.3. Dalvik Virtual Machine
Android uses a special virtual machine, e.g. the Dalvik Virtual Machine. Dalvik uses special bytecode. Therefore you cannot run standard Java bytecode on Android. Android provides a tool dx which allows to convert Java Class files into dex (Dalvik Executable) files. Android applications are packed into an .apk (Android Package) file by the program aapt (Android Asset Packaging Tool) To simplify development Google provides the Android Development Tools (ADT) for Eclipse. The ADT performs automatically the conversion from class to dex files and creates the apk during deployment.
1.4. Security and permissions
Android defines certain permissions for certain tasks. For example if the application wants to access the Internet it must define in its configuration file that it would like to use the related permission. During the installation of an Android application the user receives a screen in which he needs to confirm the required permissions of the application.
2. Android Application Architecture
2.1. AndroidManifest.xml
An Android application is described in the file AndroidManifest.xml. This file must declare all activities, services, broadcast receivers and content provider of the application. It must also contain the required permissions for the application. For example if the application requires network access it must be specified here. AndroidManifest.xml can be thought as the deployment descriptor for an Android application.
The package attribute defines the base package for the following Java elements. It also must be unique as the Android Marketplace only allows application for a specfic package once. Therefore a good habit is to use your reverse domain name as a package to avoid collisions with other developers. android:versionNameand android:versionCode specify the version of your application. versionName is what the user sees and can be any string. versionCode must be an integer and the Android Market uses this to determine if you provided a newer version to trigger the update on devices which have your application installed. You typically start with "1" and increase this value by one if you roll-out a new version of your application.
"activity" defines an activity in this example pointing to the class "de.vogella.android.temperature.Convert". An intent filter is registered for this class which defines that this activity is started once the application starts (action android:name="android.intent.action.MAIN"). The category definition (category android:name="android.intent.category.LAUNCHER" ) defines that this application is added to the application directory on the Android device. The @ values refer to resource files which contain the actual values. This makes it easy to provide different resources, e.g. strings, colors, icons, for different devices and makes it easy to translate applications.
The "uses-sdk" part of the "AndroidManifest.xml" defines the minimal SDK version your application is valid for. This will prevent your application being installed on devices with older SDK versions.
2.2. R.java, Resources and Assets
The directory "gen" in an Android project contains generated values. "R.java" is a generated class which contains references to resources of the "res" folder in the project. These resources are defined in the "res" directory and can be values, menus, layouts, icons or pictures or animations. For example a resource can be an image or an XML file which defines strings.
If you create a new resource, the corresponding reference is automatically created in "R.java". The references are static int values, the Android system provides methods to access the corresponding resource. For example to access a String with the reference id "R.string.yourString" use the method getString(R.string.yourString)); Please do not try to modify "R.java" manually.
While the directory"res" contains structured values which are known to the Android platform the directory "assets" can be used to store any kind of data. In Java you can access this data via the AssetsManager and the method getAssets().
2.3. Reference to resources in XML files
In your XML files, e.g. your layout files you can refer to other resources via the @ sign. For example if you want to refer to a color you defined as resources you can refer to it via @color/your_id or if you have defined a "hello" string as resource you can access it via @string/hello.
2.4. Activities and Layouts
The user interface for Activities is defined via layouts. At runtime, layouts are instances of "android.view.ViewGroups". The layout defines the UI elements, their properties and their arrangement.
UI elements are based on the class "android.view.View". ViewGroup is a subclass of the class "View" and a layout can contain UI components (Views) or other layouts (ViewGroups). You should not nestle ViewGroups too deeply as this has a negativ impact on performance.
A layout can be defined via Java code or via XML. You typically uses Java code to generate the layout if you don't know the content until runtime; for example if your layout depends on content which you read from the internet.
XML based layouts are defined via a resource file in the folder "/res/layout". This file specifies the view groups, views, their relationship and their attributes for a specific layout. If a UI element needs to be accessed via Java code you have to give the UI element an unique id via the "android:id" attribute. To assign a new id to an UI element use "@+id/yourvalue". By conversion this will create and assign a new id "yourvalue" to the corresponding UI element. In your Java code you can later access these UI elements via the method findViewById(R.id.yourvalue).
Defining layouts via XML is usually the preferred way as this separates the programming logic from the layout definition. It also allows the definition of different layouts for different devices. You can also mix both approaches.
2.5. Activities and Lifecycle
The operating system controls the life cycle of your application. At any time the Android system may stop or destroy your application, e.g. because of an incoming call. The Android system defines a life cycle for activities via pre-defined methods. The most important methods are:
onSaveInstanceState() - called if the activity is stopped. Used to save data so that the activity can restore its states if re-started
onPause() - always called if the Activity ends, can be used to release ressource or save data
onResume() - called if the Activity is re-started, can be used to initiaze fields
The activity will also be restarted if a so called "configuration change" happens. A configuration change for example happens if the user changes the orientation of the device (vertical or horizontal). The activity is in this case restarted to enable the Android platform to load different resources for these configuration, e.g. layouts for vertical or horizontal mode. In the emulator you can simulate the change of the orientation via CNTR+F11.
You can avoid a restart of your application for certain configuration changes via the configChanges attribute on your activity definition in your AndroidManifest.xml. The following activity will not be restarted in case of orientation changes or position of the physical keyboard (hidden / visible).
The class android.content.Context provides the connections to the Android system. It is the interface to global information about the application environment. Context also provides access to Android services, e.g. the Location Service . As Activities and Services extend the class "Context" you can directly access the context via "this".

 As you may have noticed earlier, I’m a big fan of Android’s deeply integrated voice features. Google hasn’t made nearly as many improvements here as I would have liked — I can’t understand why Voice Actions still offer the same feature set as when they launched over a year ago, especially when Apple’s Siri is one of the iPhone 4S’s biggest selling points. But ICS does introduce a major improvement in the way voice transcription works.